
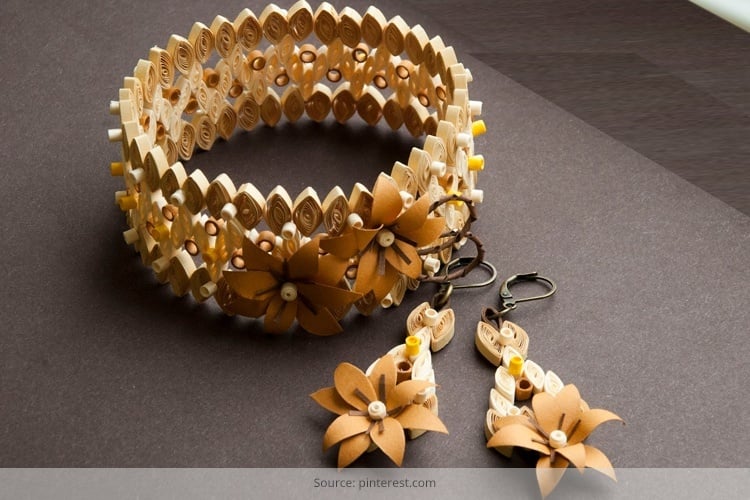
Paper quilling is an amazing form of paper art. It is a very simple technique with highly interesting outcomes. But the best part of this craft is that it is truly fun to learn and execute. Nowadays, the artwork of paper quilling patterns is practiced heavily in the making of intricate ornaments as well as fashion accessories. Paper quilling jewellery is available in wonderful designs and hence, is very high in demand.
[Also Read: Jewellery For Different Face & Body Types]
From a small chic ring to a huge elaborate necklace, paper quilling designs can be used to make almost all sorts of jewelry.
Easy-To-Try Paper Quilling Tutorials
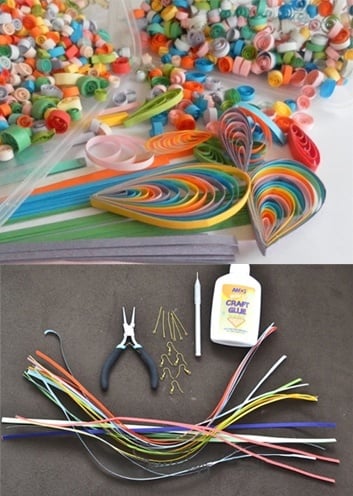
You just need to take some thin vibrant paper strips, roll them into coils or scrolls of different width and arrange them strategically in order to create stylish filigree. Interested to dig deeper? Basic supplies needed for paper quilling tutorials are mentioned below:
It is important to know what supplies you will need to know how to make jewellery by quilling:
- Quilling paper strips (available in different colors, shapes and sizes like 2 mm, 3 mm, 5 mm and 7 mm)
- Slotted quilling tool (for rolling paper strips)
- Quilling mini mold (for turning flat rigid paper coils into three-dimensional shapes)
- Quilling Comb (for making flowing patterns and loops)
- Stacked quilling form (for making paper circles)
- Crimper tool (for crimping paper strips finely or coarsely)
[Also Read: Jewellery Shops in Delhi]
- Cutter
- Plier
- Craft glue
- Clear varnish
- Various jewelry findings (as per requirements)
DIY Tutorials for Paper Quilling Jewellery
Now, it’s time to check some exciting tutes for creating customized handmade paper quilling jewellery like earring, pendant, finger ring, necklace, etc. Here we go:
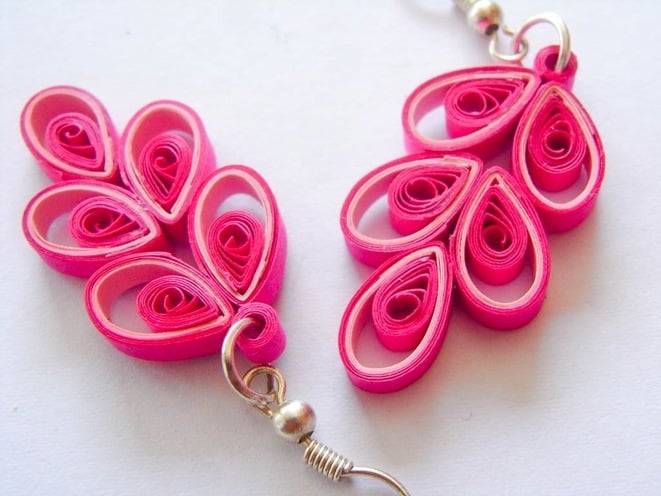
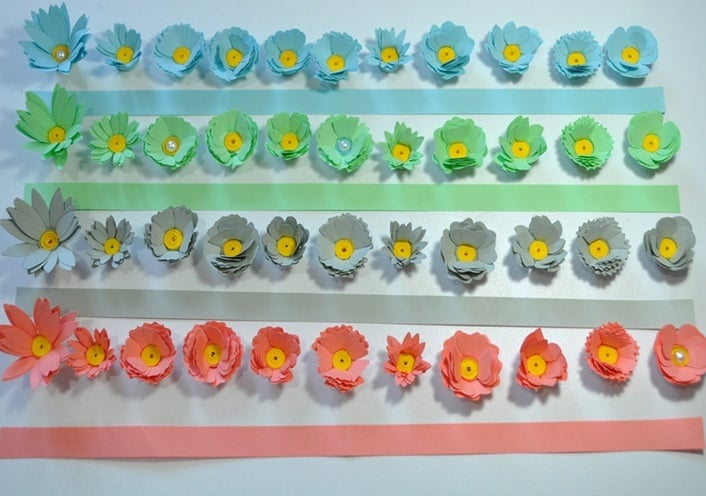
DIY – Paper Quilled Teardrop Earring
Making paper quilling earrings would be the easiest thing for you to start with. Steps are as follows:
- Take paper strips in two different colors (you may go for multiple colors too) and make 6 to 8 closed coils with each of them.
- Give to each of the coils the shape of a teardrop by using a quilling tool.
- Make the shape of a heart by attaching two teardrops of similar color with craft glue.
- Fix a coil of another color at its top. Keep attaching all other remaining coils in the same manner.
- Make the whole thing stronger by applying clear varnish to it.
- Allow it to dry.
- Finally, add jump ring and earring back to finish.
[Also Read:Top 10 Jewellery Designers in India]
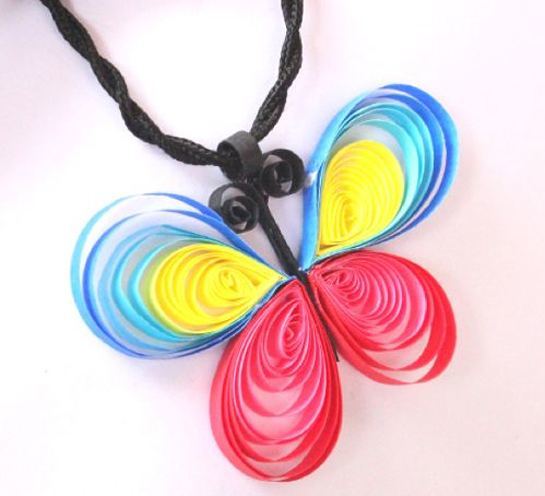
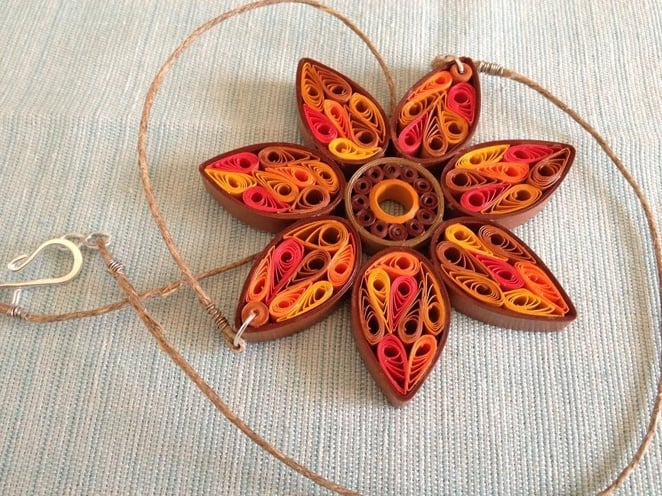
DIY – Paper Quilled Butterfly Pendant
You can match your beautiful teardrop paper quilling earring with a cute butterfly pendant made in the same way. Learn it here:
- Take colorful quilling paper strips and make closed coils of various shapes out of them.
- Arrange them in such a manner that they together form a butterfly-like shape.
- Use craft glue in between the coiled paper strips so that they don’t fall off the pattern. For a better hold, you may also use small pins.
- Coat the whole thing with a couple of layers of clear varnish.
- Let it dry completely.
- At last, attach a small jumping ring and a chain or necklace with it.
- Take 4 to 5 quilling paper strips of same color and join them together to come up with a long single strip.
- Turn it into a tight coil of 12 mm. diameter with the help of a quilling tool.
- Take another quilling paper strip of same color and make fringes of it by using a pair of scissors.
- Wrap the fringed strip around the external section of the coil and press firmly to give the shape of a flower.
- Apply a coat of clear varnish to the entire fringed flower.
- Allow it to dry up thoroughly.
- Lastly, attach it with the metal pad of a ring base with some craft glue.
DIY – Paper Quilled Necklace
If you’ve already mastered the basic quilling designs and want to explore more, start your journey with an attractive sunflower necklace. We tell you the steps here:
[sc:mediad]
- Take 7 quilling paper strips of different colors to create 7 external petals of the sunflower. Make closed coils out of them by using a stacked quilling form and shape them into pretty teardrops.
- Create 2 extremely tight closed coils with the quilling tool by taking pair of fresh paper strips.
- Attach them with the highest internal points of two external petals by using craft glue.
- Take 5 more quilling paper strips and turn them into open coils by using a quilling tool.
- Give them the shape of teardrops and apply craft glue to keep them in place. These are the inner petals of your sunflower.
- Now, arrange the inner petals inside the outer ones in a random manner and secure with glue.
- Make a large closed coil as well as some smaller closed coils with the help of the stacked quilling form.
- Place the large one at the middle and slide the smaller ones inside it to form the center of the sunflower.
- Arrange all the petals around it and fix them with glue carefully.
- Apply 2 coats of clear varnish to the whole thing.
- Let it dry.
- Add the necklace fastenings to the sunflower and you are done!
Feeling pumped up to make your own paper quilling jewelry? Just try it out. You’ll love it!
Images Source: pinterest