
Safety pins and seed beads, when paired together, create the most stunning jewellery pieces. You can make use of several color combinations. The bracelets and rings can be accustomed to fit a wrist or finger of any size.
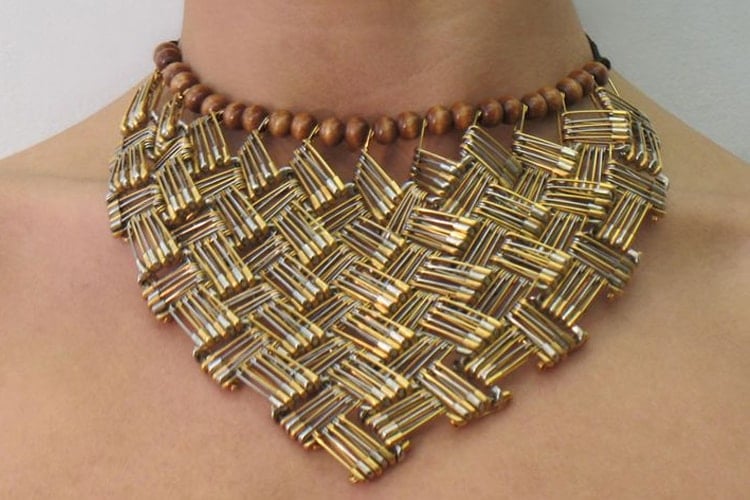
Source: theyorkshireguider.com
You can make use of a stretchy cord, ensuring the pieces fit well without sliding off. Beginners can make brooch pins for an easier approach to this DIY project. And also, smaller safety pins are the most versatile to use while customizing safety pin jewellery. This ensures that it does not look like a series of safety pin jewelry patterns until you look into it too closely.
Few DIY Safety Pin Jewellery Tutorials:
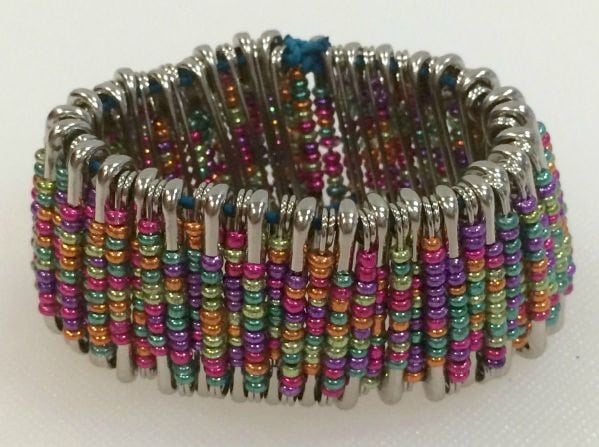
1. Safety Pin Rings Or Bracelet:
Things you need:
- Bag of small or medium safety pins (75)
- Seed beads
- Strong, clear craft, and jewellery adhesive
- Paper plate
- Toothpicks
- Elastic jewelry cord
- Scissors
- Large safety pin
Directions:
- Open one safety pin and insert the stack of beads onto the pin, leaving enough space to close the pin comfortably. Use beads of similar color or slightly darker and lighter for a monochromatic look. Or, make use of random colors if you prefer colorful accessories.
- Apply a small amount of craft and jewellery adhesive onto a paper plate. Dip the end of the toothpick into the adhesive.
- Then spread the substance over the pin tip. Close the pin.
- Open and slide additional safety pins with beads, gluing each one.
- To create a colorful line on bracelet or ring, use one color bead on each safety pin.
- Fill up enough safety to go around your wrist or finger midway. The blank safety pins can make up the other half.
- Cut two 12-inch elastic jewellery cord pieces for making the bracelet or two 4-inch pieces for the ring.
- Thread one end of one elastic piece through the top hole of a beaded safety pin. Then thread it through the bottom hold of a plain and un-beaded pin.
- Continue threading one beaded pin aligned upright, one un-beaded pin upside down, until the pin strands are long enough to wrap around your wrist or finger. Or, you can also wrap the item around your wrist or finger for the exact measurement, making sure the pieces do not slide off the elastic rope.
- Thread the remaining pieces of elastic through the opposite ends of the safety pin and string the ends.
- Take the loose ends of both elastic pieces and wrap the safety pin string into a circle.
- Check again to ensure the pieces fit your wrist or finger. Then add or remove pins as needed.
- Tie the ends of the elastic cord to one another. Trim off the excess. Add a dab of craft adhesive over the knots.
- Allow it to dry completely.
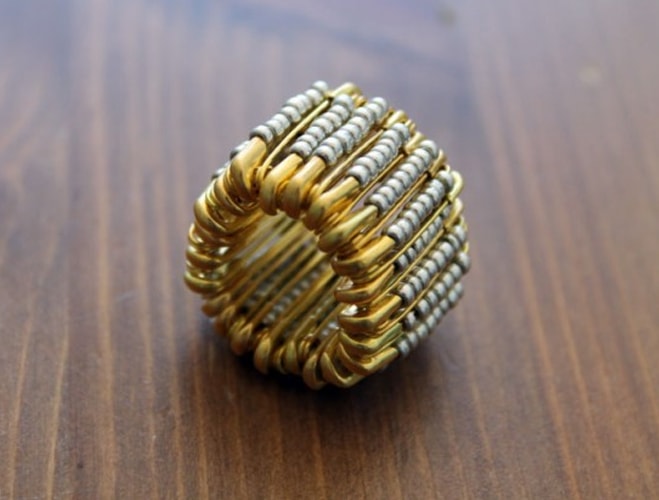
Source: wonderfuldiy.com
2. Beaded Safety Pin Brooch:
Things you need:
- Bag of small or medium safety pins (75)
- Seed beads
- Strong, clear craft, and jewellery adhesive
- Paper plate
- Toothpicks
- Elastic jewelry cord
- Scissors
- Large safety pin
Directions:
- Open 5-10 small or medium safety pins to fit into a larger pin. This can vary on the number of pins that you use.
- Stack the seed beads onto each open pin, allowing enough space to close the pins again.
- Arrange the beads into desired colors, like black and orange.
- Apply craft glue to the tip of each open safety pin. Or, make use of a toothpick to spread the glue more smoothly.
- Close each pin.
- Then open the large safety pin and slide the beaded pins onto it.
- Secure the large pin through the hole in the bottom of each beaded pin.
- Apply a small amount of glue to the tip of the large pin.
- Then close the pin again.
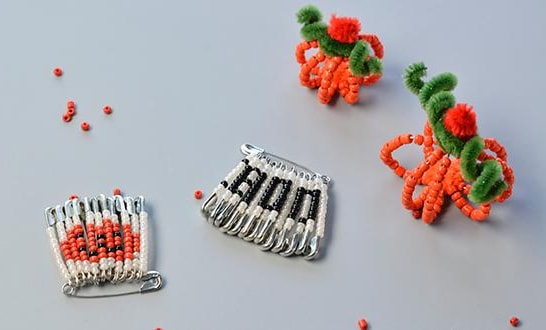
Source: pandahall.com
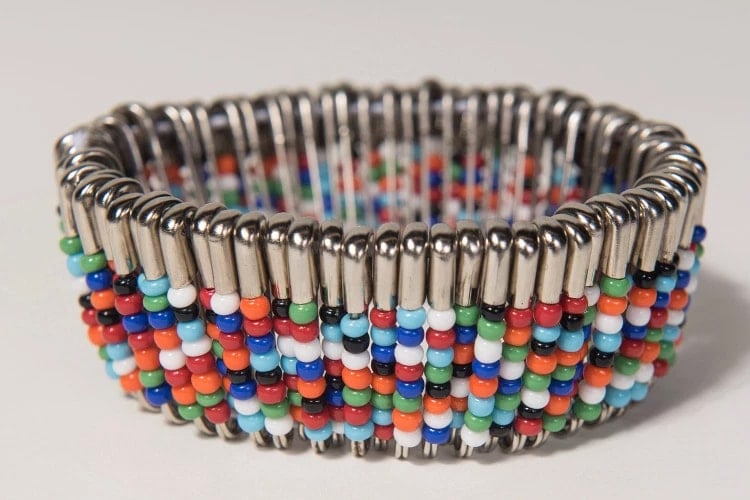
3. Basic Safety Pin Bracelet:
Things you need:
- 50-75 safety pins
- 10/0 seed beads
- 0.7 mm bead elastic
- Scissors
- Pliers
- Super glue (optional)
Directions:
- Open up a safety pin and slide seed beads onto the pin.
- Leave enough space on the tip of the pin to close it.
- Make use of any colored seed bead, but avoid the ones that are too small or won’t fit onto the pin. (10/0 size would be ideal).
- This safety pin jewelry designs will create a thick cuff-like bracelet that is covered with seed beads.
- For a wider bracelet, make use of 1-inch safety pins. For a narrower bracelet, use ¾ inch safety pins.
- Close the safety pin, and then press the clasp using pliers.
- The clasp has a gap which allows you to open and close the pin.
- For extra security, add a drop of glue to the clasp before you close the pin.
- Spread the rest of the safety pin in the same steps. (50 pins would be required for a child’s bracelet and 75 pins would be required for an adult’s bracelet).
- You can also make use of similar colored beads or experiment with different colors.
- Cut two pieces of thin, round beaded elastic. Each of the elastic should be twice the size of your wrist. Select thicker elastic of about 0.7 mm to ensure that the bracelet will be strong enough.
- Tie a knot in the bottom of the elastic. This can keep the pins from falling off while you string them.
- Thread the pins onto the first elastic, changing the direction you thread them on.
- Slide the elastic through the top hole of your first pin.
- Next, slide the elastic through the bottom of the next pin.
- Repeat the steps. Alternate the pins as you use them, making sure all the beads on the pins are facing forward.
- Thread the second elastic through the rest of the holes on the pins. Then wrap the bracelet around your wrist.
- Remove or add pins as needed.
- Tie the top two elastic strings together in a tight, square knot.
- Repeat the process for the bottom elastic. Trim the elastic down to one to two inches. Tuck each end back through the holes on the pins.
- Secure the knot using a drop of glue and allow the glue to dry.
- Trim off the ends of the elastic and close to the knot. Then half-seal them using a lighter.
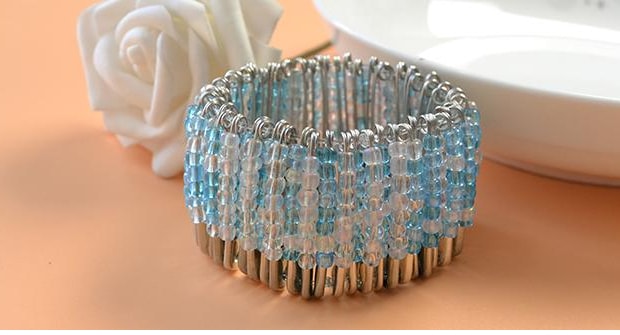
Source: coolgals.webcam
4. Delicate Safety Pin Bracelet:
Things you need:
- Safety pins
- Size 10/0 seed beads
- Jump rings
- Necklace clasp
- Pliers
- Super glue (optional)
Directions:
- Open a safety pin, and then bend the needle back until the pin becomes straight.
- Make use of pliers to open up the coiled hinge. The space needs to be wide enough for a seed bead.
- The design will create a delicate chain of beaded safety pins joined together with jump rings.
- Thread seed beads onto the back of the safety pin. Slip the beads one at a time to the pin. Loop them around the opened hinge and onto the back wire. Continue until the back wire gets filled up.
- Make use of larger seed beads. A size 10/0 would be perfect.
- Place the ends of the pliers over the hinge, and then squeeze them to close the hinge.
- Make sure to leave enough space at the tip of the pin to close it.
- Pull apart a jump ring and slide it through the top and bottom holes of two safety pins.
- Close the jump ring.
- Try this method to connect all safety pins in a chain.
- Pull the two ends of the jump ring with each other when opening it.
- Push the two ends of the jump ring towards each other when closing it.
- If there is a gap in the jump ring after you close it, then you can pinch it close using pliers.
- You can also make use of a necklace clasp and connect it to the top and bottom holes of the safety pins using jump rings.
Source: thriftyfun.com
5. Fashion Safety Pin Bangles:
Things you need:
- Memory wire
- Needle nose pliers
- Round nose pliers
- Heavy duty wire cutters
- 50-75 safety pins
- Size 10/0 seed beads
- Spacer beads (optional)
- Super glue (optional)
- Cotton or T-shirt fabric
- Scissors
- Brooch or cameo
- Necklace closer (optional)
Directions:
- Measure out a ring of memory wire, and then cut it (0.64-1.27 centimeters) each. Repeat the steps using the second ring. You will need heavy-duty wire cutters for trying this step.
- You can also make use of regular wire for this. Cut two pieces each, longer than the circumference of your wrist.
- Cut the tip of the first wire using a pair of round-nose pliers. Wrap the wire around the pliers to create a loop and pull it off. Repeat the steps for the second wire.
- Make use of a larger seed bead or else it won’t fit into the pin. A size 10/0 would be ideal.
- Then use a pair of needle-nose pliers to press the clasp of the safety pin close so that it doesn’t pop open. For added security, put a drop of super glue into the clasp.
- Slide a safety pin into the wire through the top hold. Slide the next one through the bottom hole.
- For a more interesting bracelet, add a spacer bead between each safety pin. Repeat the same steps.
- Start by weaving at one end of the bracelet, finishing at the other. Make sure to weave between the beads, using two beads on top and two at the bottom.
- Weave back and forth across the bracelet until the space between the beads is filled. Once the front part is done, weave the fabric through the back of the bracelet.
- You can add a necklace closure using jump rings or sew on a hook and eye closure using a needle and thread.
- You can also make use of a brooch, cameo, or embellishment. If you are using a brooch, you can pin it to the front of the bracelet. If you are making use of a different type of embellishment, secure it using fabric glue or an industrial strength glue.
Source: ocregister.com
7. Safety Pin Necklace:
Things you need:
- Old necklace chain
- Handful of safety pins in similar size
Directions:
- Start by threading all your safety pins onto your chain or elastic.
- Thread them through the small hole in the bottom and not through the bigger space.
- Continue with this step until you are done.
- And your safety pin necklace is ready.
Source: cutoutandkeep.net
For every accessory lover, experimenting with new DIY ideas brings a lot of excitement. So, go bold and have fun with these seven safety pin jewellery tutorials. Don’t forget to tell us in the comments box below, which one is your favorite design from our list!