
Ripped jeans literally cost a bomb! In fact, the more shredded they are (they have literally less cloth on them), but you will still end up paying a bomb. So why don’t we just learn how to make ripped jeans? There are plenty of ripped jeans tutorial available on the internet tub, the confusion is how to rip jeans and leave the white thread? In this article we will give you some really sound advice on how to make homemade ripped jeans in a cheap and effective way.

Source: pinterest.com
How To Make Ripped Jeans Tutorial: Three Easy Steps
These three steps are the best DIY ripped jeans instructions that we found online and we swear by them! Follow these and get the ripped jeans of your dreams without spending a bomb!
[Also Read: Distressed Jeans – Learn To Carry It Like Our Divas]
Step 1: Choose The Right Kind Of Denims
The first and foremost step in creating the right kind of ripped jeans is to decide on which pair of jeans you would want to experiment on. It’s not just the colour that you have to choose, there are hundreds of other things to consider-like would you want your ripped jeans to be skinny, or high waist or would it be better to go with your boyfriend jeans?
A good idea would be to experiment on a cheap pair of jeans before you begin snipping on your expensive ones and if you like that distressed look, it would be better to wash your jeans in bleach and then start the ripping process.

Source: lookbook.nu
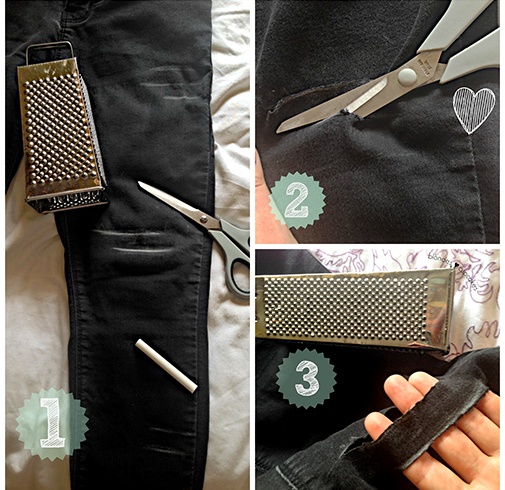
Step 2: Gather The Right Supplies
The key to getting the right kind of DIY ripped jeans is to have them distressed before you begin with the ripping. Rips on a brand new pair of jeans look really out of place. So use some sandpaper, steel wool or some pumice stone to prep your jeans. Now decide where to have the rips. Now use scissors or cutters to rip straight, horizontal slits in areas you want to distress. To make pulling out the indigo threads (i.e., the synthetic thread of the dyed and manufactured denim material) even easier, make sure that the slits you rip are at least 1/2-inch to 3/4-inch from each other.
Source: blondeslovecupcakes.com
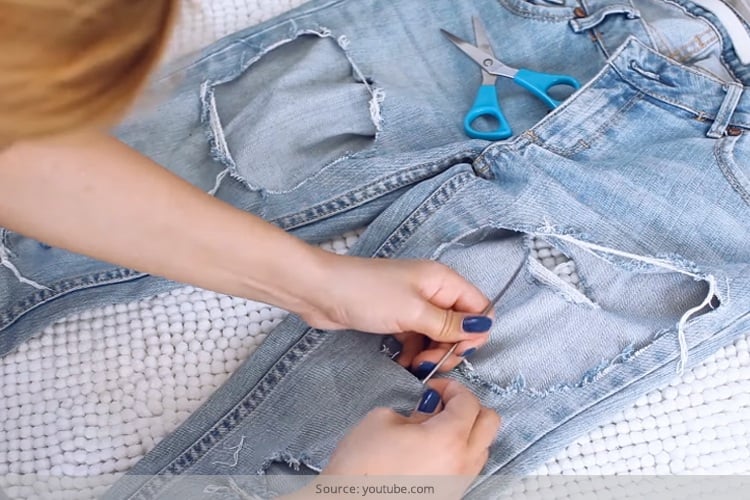
Step 3: Make The Holes!
If you are a stickler for equal rips then you should also have a ruler to make the ripping symmetrical. If you want big holes in your jeans that you can start ripping it with your hand itself, but if you would rather prefer the white threads, then you should go for scraping the denim carefully so that the threads begin to appear. You can use a tweezer to further make those rips frayed. This definitely adds to the charm of the DIY ripped jeans.
For starters, limit your frays and rips. You don’t want to go overboard with all the rips because they may make the jeans look shoddy. Concentrate on few rips at a time to get your dream ripped jeans!
Here are some more ripped jeans worn by fashion bloggers. Take these for inspiration before you begin your ripped jeans journey. Remember, for beginners, less is more!
When It’s More About The Holes: This fashion blogger takes the rips to another level with her symmetrical cuts

Source: wordpress.com
From Here To There: Look how dramatically different boyfriend jeans can look once you give them a ripped look
[Also Read: How To Wear Boyfriend Jeans]

Source: wordpress.com

Source: youtube.com
So there you go, some amazing DIY ideas and inspiration to get you started on your ripped jeans journey!