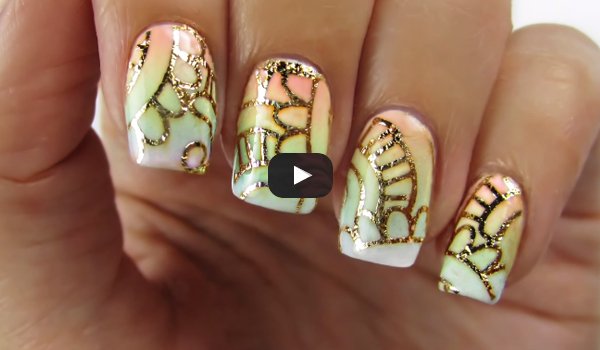
Accessories doesn’t always mean sprucing up on shoes, bags and jewels. It could also mean adorning and decorating nails. Nail art is the perfect way of pampering and tending of nails that most women indulge in and we simply have no reason to dislike it. Over the days that rolled, we have seen this trend evolve immensely in the beauty world.
From the 20s to the recent years, the women from all over the world are seen obsessing over different forms of manicure. And satiating their interest is the growing nail art patterns and ideas, starting from floral spring nail art, frozen fractal, to quirky animated nail art, and the list goes on.
[Also Read: Pokémon Go Nail Art Design]
It is well known that nail art can take a toll on you if you have got unsteady hands. But there are certain nail art designs which do not involve perfect lines or steady hands. All one needs is the right set of tools to attain this creative style of nail art. One such style of nail design that has become an obsession is the gold foil nail art. This nail trend has taken the internet by storm and in this video, you will get to watch how to create gold foil nail art. There are plenty of gold foil nail art ideas that are surfacing and here is one of the simplest to begin with.
Here Are The Steps To Create Gold Foil Nail Art
Step 1:
Start off with a base coat to protect your natural nails texture. This step will help prevent your nail from staining and chipping.
Step 2:
Over the base coat, apply a white nail polish to begin with. Depending on the opacity of the white polish, apply one or two coats. Allow it to dry completely before moving forward with the next step.
Step 3:
To speed up the drying process, you can apply a fast drying top coat. This step is completely optional.
[sc:mediad]
Step 4:
Use a makeup sponge for the application of ombre pastel shade on the nails. To begin with, create painting stripes of desired color palette on the makeup sponge. For deeper and desirable effect, paint the stripes properly.
Step 5:
Use this makeup sponge and dab it over your nails. The initial step is a little tricky and might not turn out perfect. Repeat the same process until you get the desired design and colour. This can be achieved with a few trials.
Step 6:
The step of using the gold foils is the most crucial part of creating gold foil nail polish. Purchase gold foils that are available at accessory stores or online. Click on the link given in the description box of the video to order it online.
Step 7:
Step 9:
Peel off the excess tattoo using tweezers or dissolve it using a cotton swab dipped in nail polish remover.
Step 10:
Lastly, apply top coat to seal in your design and to add a beautiful shine to your nails. These steps finish the segment of gold leaf for nail art.
Check out the video to learn more on this gold foil nail manicure. Be sure to try it out on your next big occasion. We would love to see your own version of nail art so tweet in to us @Fashionlady with the hashtag #goldfoilnailart
